You have been reading this journal completely add free, but that is about to change. I am advertising a Live Event in which we will be presenting through the computer some of what has been going on the cruise. We will show slides with the pictures of the trip and talk about the science in them. The biggest benefit is that you will be able to ask us questions in real time. All you need is a computer with internet access, speakers and a microphone (or a phone, if your computer does not have a microphone). Have you ever talked on the computer or phone with scientists in the Southern Seas? This is your opportunity, Technology is amazing! All you have to do is register for the event. I hope to hear you all then. Here is the add:
Join us for the upcoming real-time PolarConnect event with PolarTREC teacher, Juan Botella, and scientists of the Seawater Property Changes in the Southern Ocean who are on board the IcebreakerAn icebreaker is a special purpose ship or boat designed to move and navigate through ice-covered waters. N.B. Palmer of the coast of Antarctica! Participants will learn more about the oceanography of the Antarctic and how scientists are studying this unique place.
Anyone is welcome to participate: classrooms, teachers, or just interested members of the public. These events are hosted through the PolarTREC PolarConnect (formerly Live from IPY!) program, and participants will have a chance to learn from the scientists, ask questions, and chat with others during the presentation.
EVENT DETAILS
DATE: Thursday, 14 April 2011
TIME: 1:00 PM AST (2:00 PM PST, 3:00 PM MST, 4:00 PM CST, 5:00 PM EST)
Registration: To register (required, but free) and to receive instructions on how to join, go to: http://www.polartrec.com/polar-connect/register
Now back to our feature presentation:
Yesterday was another day full of excitement as we deployed a 4500m long mooring. We would have liked to deploy it on Saturday, but bad weather kept us waiting a whole day. A good deployment requires science, hand skills on deck, art and luck. We found a great balance among these ingredients in a very successful deployment. The weather was pretty good and varied. We started with light snow at 8:00 am, and by 1:00 pm we had a sunny day. Seas were pretty good for what they had been on Saturday.
The scientist in charge of the mooring is not here on the boat. She designed the mooring to be in about 4500 m of depth with most of the instruments attached between 100 m and 200 m of depth. Jim Ryder brought all the cables, floats, heavy weight and instruments according to the plan. This means we cannot put the mooring just nearby where the scientists wants, it needs to be at a precise location at the given depth so the instruments end up being at the right depth.
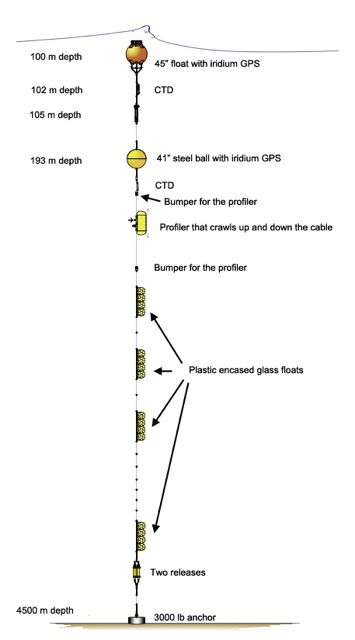
Imagine we go out and deploy the mooring in an area that is actually 100 m shallower than expected. No big deal, right, 100 m out of 4500 m is a small fraction. But, if the top buoy is supposed to end at 100 m of depth, as it is the case in this mooring, and we deploy it in this shallower area, the buoy will now end up in the surface. The instrument that is supposed to be at 102 m would only be at 2 m below the surface.
The first step for a successful deployment is finding the right spot in terms of depth and where the scientist wants it. It would be great to find a large area that has that depth, so we have more margin of error, but it depends on the bathymetry, not on us. When looking at the map we found a better place for the deployment in therms of the depth a few kilometers away from where the scientist wanted it, but we cannot just decide to move it for our convenience, since she chose that particular spot based on interesting oceanographic phenomena. We spent a few hours on Saturday with our multi-beam sonar determining the exact depth at the location to be deployed. We then sent the rosette with an altimeter to precisely measure the depth at that point.
The mooring is assembled as we deploy it. I spent a few hours with Jim on Wednesday spooling the 4.5 km of cable. We needed to reel it out as we go and attach the instruments and buoys. We put the cable and instruments on the water starting from the top as soon as we attach them. The whole process takes about 7 hours.
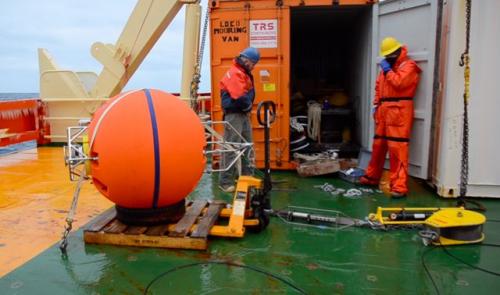
It is not a good idea to spend the seven hours above the location for the mooring as we put overboard the cable, floats and instruments because the cable would just get tangled in a huge mess. It is better to have the ship sail very slowly so the cable aligns behind the ship like a fishing line. Remember we deploy the upper part of the mooring first, the one with the biggest floats.
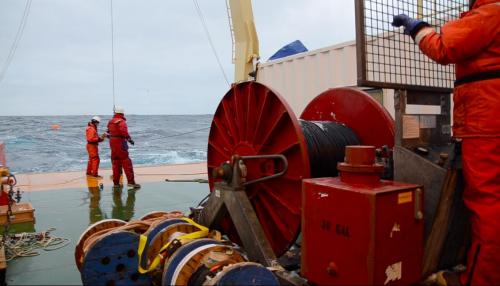
The first floats kept the mooring afloat, which allowed Barry and Jim attach the instruments on the cable. Jim had placed marks on the cable where each instrument should be attached, and Alex had the diagram with him to verify everything's right placement.
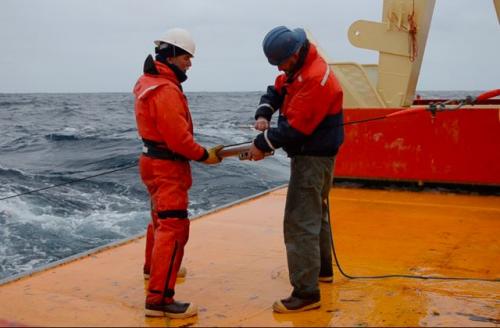
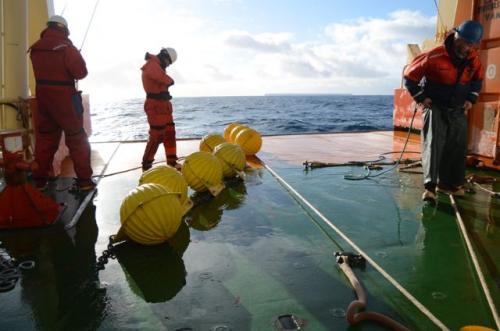
Every now and then, at precise spots on the cable, strings of encased glass floats where placed. Here is one of those beads of floats ready to be attached to the cable. I can tell this was towards the end of the deployment by the sunny skies.
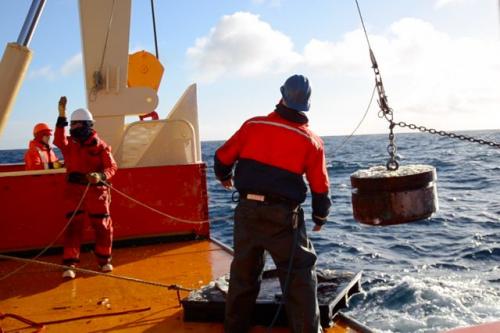
The art part comes for the timing of events. We need to begin the process far from the spot where we want the mooring to be, about 7 miles away, and sail towards this spot as we deploy the instruments. We need to time everything so when we have all the mooring out and just need to drop the heavy weight we are actually in the desired spot. It worked like a charm. Jim synchronized the whole process like magic. The heavy anchor of 3000 pounds is deployed at the end, when we have more than 4500 meters of cable floating in a straight line behind the ship with many instruments and floats attached to it. Jim said we sailed past the right spot about 300 m because the drag of the rest of the mooring pulls the weight back. It takes about an hour for the anchor to make its way to the bottom, pulling all the floats and instruments.
We did a triangulation with the ship around the mooring communicating with the transducers of the release (see March 20 entry for a description of the release and transducers), to make sure every thing is working well and to find the exact location of the landing. The anchor does not fall in a straight line; we cannot assume we know its location by the place where we dropped it. The anchor landed extremely close to where Jim wanted it to land, within less than 200 m away from the target. That was a great deployment!
Instalación de un fondeo
Hasta ahora haz podido leer este diario sin comerciales, pero eso está apunto de cambiar. Estoy anunciando un Evento en Vivo en el que presentaremos en la computadora lo que ha estado ocurriendo en el crucero. Mostraremos fotos del viaje y explicaremos la ciencia que hay detrás. El mayor beneficio, me parece, es que podrás hacer preguntas en tiempo real. Sólo necesitas una computadora con acceso a internet, bocinas y micrófono (o puedes usar el teléfono si tu computadora no tiene micrófono). ¿Haz charlado alguna vez con científicos en los Mares de Sur por teléfono o computadora? Esta es tu oportunidad; ¡la tecnología es impresionante! solo tienes que registrarte para el evento. Espero poder escucharte entonces Aquí el anuncio:
Participa en una charla con Juan Botella e investigadores del proyecto 'Cambios en las propiedades del agua de mar en los Mares del Sur' abordo del rompehielos de investigación N.B. Palmer en as costas de Antártica. Los participantes aprenderán sobre oceanografía en Antártica y sobre como están estudiando los científicos esta región única.
Todos están invitados a participar: salones de clase, maestros, o público en general. El evento será en inglés y está organizado por el programa PolarTREC PolarConnect (antes Live from IPY!). Los participantes tendrán la oportunidad de aprender de los científicos, hacer preguntas y charlar con otros durante la presentación,
DETALLES DEL EVENTO
FECHA: Jueves 14 de abril del 2011
HORA: 1:00 PM AST (2:00 PM PST, 3:00 PM MST, 4:00 PM CST, 5:00 PM EST)
Registro: Para registrarse (obligatorio pero gratuito) y para recibir instrucciones en como participar, vaya a http://www.polartrec.com/polar-connect/register
Y seguimos con nuestra programación habitual.
Ayer fue otro día lleno de emoción con la instalación de un fondeo de más de 4500 m. Nos habría encantado instalarlo el sábado, pero el mal tiempo no nos lo permitió. Una buena instalación requiere de ciencia, manos hábiles en cubierta, arte y suerte, Encontramos un buen balance entre estos ingredientes en una instalación exitosa. El estado del tiempo fue muy bueno y variado. Empezamos a las 8:00 de la mañana con un poco de nieve y a la 1 de la tarde que terminamos el día estaba soleado. El oleaje también se portó muy bien, comparado con el del sábado.
La científica a cargo del fondeo no se encuentra a bordo. Su diseño estipula una profundidad de 4500 m con la mayoría de los instrumentos en una profundidad entre 100 m y 200 m. Jim Ryder trajo los cables, flotadores, el anclaje y los instrumentos para poder armar el anclaje. Esto significa que no podemos poner el fondeo en cualquier sitio cercano al lugar den el que la científica lo quiere, necesita estar en un sitio determinado en parte por la profundidad para que los instrumentos terminen en la profundidad adecuada.

Imagínate que instalamos el fondeo a una profundidad 100 m menor a la requerida. No hay gran problema, ¿verdad? 100 m de 4500 m no son muchos. Pero si la boya superior debe quedar a 100 m de la superficie, com es el caso en este fondeo, y nosotros lo instalamos en esta zona más somera, la boya superior quedará en superficie. El primer instrumento que tendría que estar a 102 m estaría a tan sólo 2 m de la superficie.
El primer paso para una instalación exitosa es el encontrar el punto adecuado en términos de lo que quiere la científica y la profundidad. Sería maravilloso encontrar un área grande a la profundidad requerida, ya que así tenemos más margen de error, pero todo depende de la batimetría, no de nosotros. Cuando vimos el mapa de la región, encontramos un mejor sitio para la instalación en términos de la profundidad a varios kilómetros del sitio que queremos, pero no podemos cambiar la posición a nuestro antojo. La científica escogió esa zona con base en algún fenómeno oceanográfico de interés. Nos pasamos varias horas del sábado peinando el área en busca del lugar adecuado con nuestro sonar multu-rayos. Después bajamos la roseta ya que tiene un altímetro para conocer la profundidad con mayor exactitud.
El fondeo se va armando conforme lo ponemos fuera de borda. Me pasé varias horas el miércoles con Jim ayudandole a enrollar los 4.5 km de cable en un gran carrete. Ahora sacamos el cable poco a poco, colocamos los instrumentos en el sitio adecuado y lo pusimos en el agua. Empezamos con la parte alta del fondeo y tardamos siete horas en el proceso.

No es conveniente parar al barco sobre le punto en el que se quiere poner el fondeo e ir sacando el cable con los flotadores e instrumentos ya que el cable acabaría por enrollarse, Es mejor ir tirando el cable mientras el barco avanza a poca velocidad para que el cable se vaya extendiendo detrás como un hilo de pesca. Recuerda que lo primero en tocar el agua es la boya que quedará hasta arriba.

Las primeras boyas mantienen todo a flote, lo que le permite a Barry y a Jim el enganchar los instrumentos. Jim tenía marcado en el cable los puntos en los que va cada instrumento y Alex llevaba el diagrama para verificar las posiciones.

De vez en cuando, en los lugares precisos en el cable, se amarran los flotadores de vidrio con cobertura plástica. Aquí una foto de un racimo de flotadores listos para agregarse al cable. Te puedo decir que la foto fue tomada al final de la instalación cuando ya había salido el sol.

La parte artística llega al tener que evaluar el tiempo necesario para la instalación. Necesitamos empezar a armar el anclaje como a once kilómetros del sitio en que se pondrá al ancla para terminar en el sitio correcto al tener el fondeo armado. Esto involucra una precisión bárbara en tiempo. Funcionó de maravilla. Jim sincronizó el proceso como mago. El anclaje pesado, de unas 1.4 toneladas, se manda al final, cuando tenemos más de 4500 m de línea arrastrando detrás con los flotadores e instrumentos. Jim dijo que nos pasamos 300 m el sitio del fondeo ya que la resistencia del resto del fondeo jala el anclaje hacia atas mientras cae. Le toma una hora al anclaje llegar al fondo, jalando el resto del equipo.

Hicimos una triangulación con el barco alrededor del instrumento mientras Jim se comunicaba con los transductores de los liberadores (lee el diario del 20 de marzo para una explicación de los transductores y liberadores), para verificar que todo funcione bien y que el anclaje se ubique en el lugar correcto. El anclaje no cae en línea recta al fondo; no podemos suponer que conocemos el sitio en el que está porque sabemos donde lo arrojamos al mar. El anclaje terminó muy cerca de donde se quería, a menos de 200 m del objetivo. ¡Fue una gran instalación!

Comments